July ’13 Update:
The tubeless conversion has held out great. Lots of miles ridden, both with bikepacking gear and in my local, rocky trails. No issues at all. Since then, I’ve used the same method to run a Rabbit Hole with my Rohloff hub, and then swap out a set of Schwalbe Smart Sams (29×2.25) for the Knards and fit them to my Ogre frame – using the same 24″ inner tubes I’d already sliced. In hindsight, it’s probably best to leave a little more of a ‘skirt’, so it’s easier to reuse the inner tube again.
More semi-nerdish gear talk, I’m afraid. A persistent cold and rattly lungs have delayed my travels plans – I’ll be heading off for a few days of Arizonan bikepacking very soon though, hopefully returning with a story or two to tell.
In the meantime, I’ve been inspired by nearly-neighbour Gypsy by Trade, and his pursuit to fine-tune his tubeless fat tyre conversions. Nick and an ever growing legion of fat bike riders are doing goathead-battle along Albuquerque’s river trails. They seem to be winning.
When it comes to prickly things, Santa Fe isn’t so different – indeed, the same could be said for the whole of the South West. Devil’s eyelashes, as goatheads are more poetically called (not that there’s anything romantic about them) mine the bike paths around town. It’s not uncommon to discover a dozen of these vengeful thumb tacks clinging tenaciously to your tyres, should you inadvertently stray off trail. To avoid a lifetime of patching inner tubes peppered with puncture wounds, you can inject in a few globs of sealant. If a goathead or thorn worm its way through your tyre, this sealant reacts with the air, plugging the hole. A few strokes of bike pump and you’ll be ready to roll again.
Better than this though, for various reasons, is moving over to a tubeless tyre system. To anyone unfamiliar with the concept, it’s basically a tyre that doesn’t require a separate inner tube to hold its pressure. Instead, the bead of the tyre presses against the lip of the rim to create a seal, secured in place with the addition of some sealant. Again, puncture = air, and air = seal. Clever stuff. There’s several brands around to choose from, the most popular being Stan’s Notubes. You can even make your own with stuff like liquid latex, water and glitter. Whichever brand you use, you’ll need to top up your tyres occasionally, as the sealant dries out over time. A small price to pay for a puncture-free existence.
Homemade
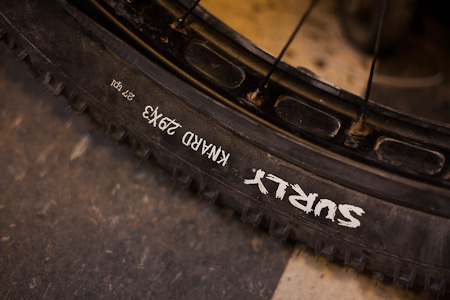
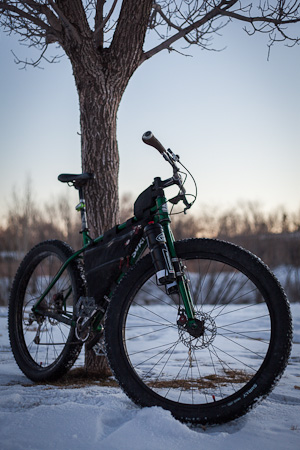
Most mountain bike tyres and rims nowadays are designed to be run tubeless. Even if they’re not, there are various official conversion kits to help you. None exist for wide rimmed fat bikes as yet – such as the Krampus I’m now riding. Thankfully, this homemade conversion is surprisingly straightforward, as the Knard bead and Rabbit Hole rim play particularly nicely together. In fact, although more fiddly than simply throwing in a new tube, I’d say it proved easier than my recent endeavours to convert the Ogre, using one of Stan’s expensive tubeless conversion kits.
Compared to running tubes with sealant, the perks of tubeless riding include a slight loss in rotational weight, which is always welcome. But it’s the puncture-proofing them aspect that interests me the most. Inner tubes filled with sealant works ok-ish, but they’re nothing like as effective as a proper tubeless setup. This is just as well, as heavyweight Knards (1200g or so) have a large, grippy tyre patch, and have a habit of hoovering up goatheads and other prickly flora.
Performance-wise, a tubeless setup promise lower tyres pressures without fear of pinch flatting, translating into better grip and a more comfortable ride. I’d even go as far as saying that tubeless tyres are such an improvement that it’s hard to go back to tubes once you’ve tried them – only the fact that they rule out changing or rotating tyres easily deters me from running them while long distance touring.
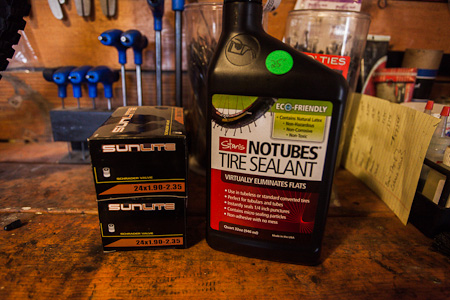
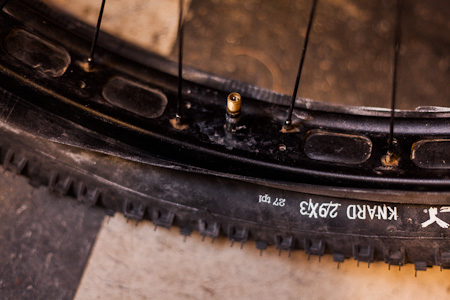
Converting the Krampus: two 24in tubes and some sealant required. A bottle like this should last me many, many months.

First, wrap a length of Gorilla tape, or similar, over the Surly rim tape. It’s a touch wide for the Rabbit Holes, so thin it down by a couple of millimetres as you go. Puncture the hole where the valve pops through – I’d pre-drilled mine out for Shraeder.
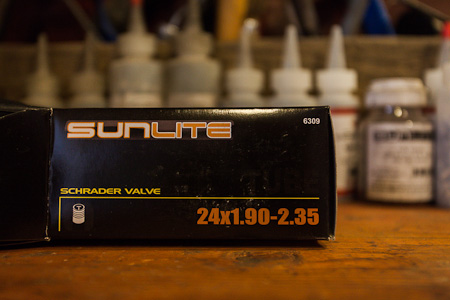
24in tubes make for a tight fit on a 29er rim. I went for Shraeder valves, so I’d have the option of using a compressor at a gas station if needed. Away from home, Shraeders should also be a bit easier to inject sealant into.
Lay the inner tube around the rim, and then fillet down the seam, taking care not too cut too deep into the other side of the tube.
Then, peel the tube back. Here, you can see why a 24in tube works best, as it provides a tight fit.
Seat the tyre onto the rim. I was able to work it into place without the need for a tyre lever.
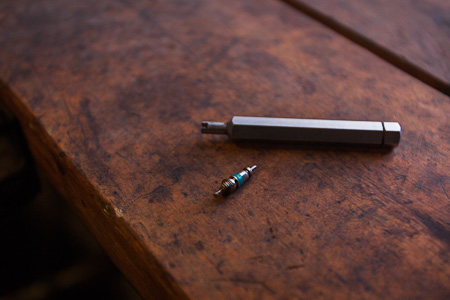
The core of the Shraeder valve is then removed. If you’re using Presta valves, make sure they are the kind with a removable core – you can tell as they’ll be flat ended. Inflate the tyre to check it holds.
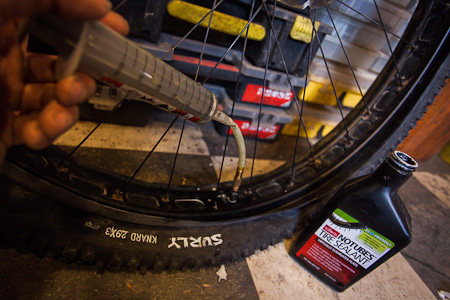
Sealant is then injected in, before the tyre is re-inflated. It’s a good idea to gyroscope spin the wheel horizontally and vertically to make sure the sealant gets everywhere, even though the inner tube creates a tight, air-proof seal.
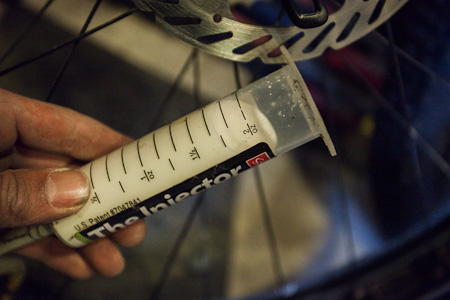
The recommended dosage for a standard 26in mountain bike tyre is 2oz. I doubled it for a fat 29er.
A quick blast of the compressor seats the bead – though the Knard locked in so easily it felt like just a vigorous workout with the floor pump may well have been enough. Having already ridden with the tyres for some time, they settled in quickly with no high or low points, once I’d taken them up the max recommended 35psi. Otherwise, it might be worth warming them slightly next to a radiator and trying again.
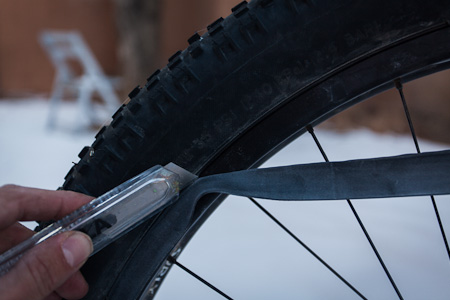
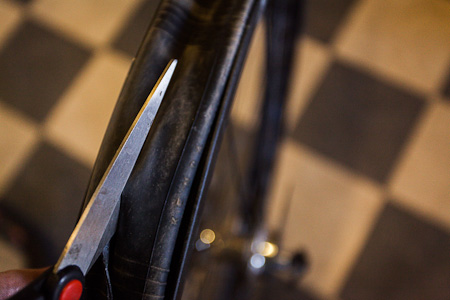
The nerve racking bit. Remove the excess tube with a sharp blade. I pressed the knife handle against the tyre sidewall as a guide, helping to keep the blade running straight.
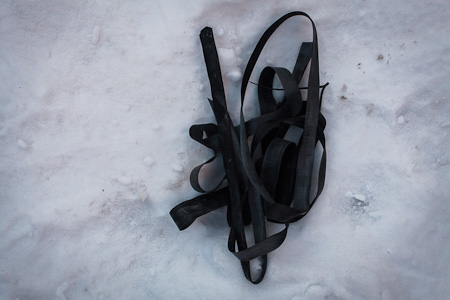
Leftovers = less weight (-:

Once trimmed down, the inner tube skirt will be virtually unnoticeable. This style of tubeless conversion is said to be more effective at reducing tyre burps – the occasional loss of air when the tyre sidewall is pressed in by a rock – that can befall tyres and rims that aren’t designed to be tubeless compatible.
I can now cruise, imperturbably, around Santa Fe’s trails…
Goatheads, plague of the past.
I’m relatively new to tubeless mountain biking, so still in the evangelical stage. Try it!
Touring tubeless
As I mentioned, the downside to tubeless is that it’s a fiddly process to swap tyres, or rotate them, as you might do on a long journey. For shorter tours though, they make a lot of sense.
Tubeless tyres are more prone to sidewall failures than regular ones, so it’s worth knowing what to do in an emergency situation if you’re going light and not carrying a spare. Here’s Minimal Master Gary’s advice:
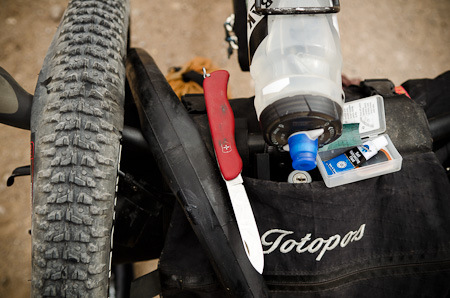
‘I carry a heavy needle with some dental floss for thread and a couple of the Park TB2 glueless tyre boots for smaller cuts, which will cover most repairs. For longer, 2-3 ” long for gashes, I add I cut a section of sidewall cut out from an old tire, using Shoe Goo (you can get 1oz tubes) to glue the boot in after sewing the cut. Let the glue dry overnight with the tube in place; just a bit of air to hold pressure on it – I’ve not had a cut so bad that I couldn’t wait till night to do this. Usually you can just use a Park boot and maybe sew it up. I carry superglue to hold the cut together – this isn’t an issue with tubes as it’s easy to get inside and boot it. The Saguaro I was using on our trip had 2 spots with minor cuts. I just covered the cut area with Shoe Goo and let it sit on it’s side overnight.’
Gary’s update:
‘Shortly after I wrote the advice above I came across the tubeless plugs, or ropes. I highly recommend them. They work really well for punctures that are too big for the sealant but not so big you need a boot. I’ve used them twice, once on my tire and once on a friend’s and it worked great both times. It seems to be a permanent repair too. I also now carry a curved needle so I can sew the outside of a sidewall without removing the tire.’
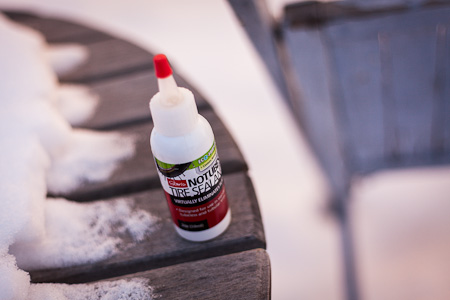
As well as a couple of spare inner tubes with removable cores, Gary carries at least one 2oz (59ml) bottle of Stan’s while touring, to top up his tubeless tyres if need be.
Thanks to
Dave and Mark at Mellow Velo, Santa Fe’s sharpest bike shop, for use of tools and compressor. I was able to benefit greatly from Nick and Jeff’s R&D at 2WD in Albuquerque – which made this conversion far more straightforward than it might have been otherwise.
Any more tips? Please let me know.

Thanks for documenting the setup well, will give this a try once the spring comes. How do you like the Knards, looking to use the 3.8″ version once the Larry/Endomondo combo is worn out, at least in the back?
I like them a lot. I find them a really predictable tyre in the way they grip and corner. They roll surprisingly well on hardpack and pavement too. I’ll have to report back on longevity though. The rocks round here are pretty hard on smaller block tyres, and some of them are crumbling a bit. I know Nick has a pair in 26×3.8, so you could see what he has to say.
Nice write up! Shortly after I wrote the advice above I came across the tubeless plugs, or ropes- http://www.genuineinnovations.com/bicycle/accessories/tubeless-
tire-repair-kit.html
I highly recommend it. It works really well for punctures that are too big for the sealant but not so big you need a boot. I’ve used it twice, once on my tire and once on a friends and it worked great both times. It seems to be a permanent repair too.
I also now carry a curved needle so I can sew the outside of a sidewall without removing the tire.
Link-
http://www.genuineinnovations.com/bicycle/accessories/tubeless-tire-repair-kit.html
I haven’t found a way to carry Shoe Goo that will keep it from drying out. The Goo dries up in the small REI containers within a few weeks. Has anyone found a small container that will work? Apparently any air exposure at all causes it to set up. The stuff is great for all sorts of repairs so it’s good to have some on tours, but I have a hard time justifying carrying a whole tube of it.
Haven’t tried it on tires, but I use urethane glue for other repairs as a shoo-goo replacement. You can buy single serving packets of urethane here:
http://theepoxysource.com/urethane.htm
Great write up on tubeless. I’ve only gone tubeless using the UST system on normal mtb wheels. Interested in trying this ghetto variety.
Cool, thanks for that, I’ll have to check it out.
I updated the post with news of a 1oz shoo-goo tube available on Amazon, and some of Gary’s extra tips.
I know each tyre and rim combo can be different, which impacts how easy and effective this style of conversion are. Certainly, the Knard/Rabbit Hole works great. It’s held up really well to a week of hard riding too.
Gary,
I’ve used shoe goo quite a bit, and it usually lasts me for months. I’ve only had it go solid once. The key is to put something on the threads to prevent it from setting up before you seal the bottle back up. I’ve used petroleum jelly, and that’s probably the best. However, I don’t usually carry that around, so I’ve been using hand sanitizer with good results. I bet sunscreen would do a good job too, probably better than the hand sanitizer. It’ll keep the top from getting glued on, and keep air from getting to the goo inside the tube.
Also, if the top does seal up on you, sometimes you can pop a small hole somewhere else in the tube and squeeze it out of that. Messy, but the hole should seal up afterwards. Needless to say, carry this stuff in a good ziplock…
I’m curious if anybody has tried contact cement on a tire? Weldwood is what I use to resole my climbing shoes, and it works really well. You spread it on both surfaces, let them sit for 45 minutes, then put them together and hammer the hell out of them, park a car on it, etc. Barge cement is another brand that comes in smaller, shoe-goo like tubes. After my recent experiences with weldwood, I think I’m done buying shoe goo.
Thanks Gary. I just saw those in a shop in El Paso – and I was going to ask you about them. I figured the guys in the Chihuahuan desert must know their tubeless repairs…
Will add them to the list.
Wow, that seams like a lot of work but very ingenious.
Actually, with the first tyre I went slowly to think it through (and take some pics). The second was much speedier. Maybe half an hour. It seems much more fiddly than it is…
Excellent posting! Here in south-west Texas, the debate between running tubeless vs. Slimed tubes continues. Thorns are a major issue but it’s also VERY rocky here so side-wall slices are fairly commonplace; what’s been your experience running tubeless while trying to deal with a sliced tire?
Thanks Alex – I’ve just updated the segement on tubeless tyre repairs that Gary wrote, at the bottom of the post. I’ve not yet (tap on wood) had a significant cut on a sidewall yet. The Knards seems to have pretty a burly construction. I guess that would be a factor in choosing what tyres I’d use tubeless – I’d definitely happy with sacrificing some gram saving for strong sidewalls. The rocks here can be sharp in places, but not as dagger-like as in the Chihuahuan desert…
Good for the geeks! … however appreciating your new interface … looks great!
Thanks! Packlists are fun – writing them down helps whittle them down…
The new look interface is just a stop-gap until the new, fully fledged site is launched… Soon, hopefully!
Loving the new look to the blog – very clean. Are you using wordpress.com or the downloaded software itself?
Thanks Chris. As it happens, this isn’t the new-look blog! It’s just the standard wordpress theme, in place while the actual site is being built. As you say, it’s clean and easy to read though. Previously, I used wordpress.com, but now it’s downloaded.
I’ll definitely be doing this to my Pugsley in the near future. Thanks for the nice documentation.
I’m sure you’ve checked Nick’s post and seen how he used a layer of foam for the Pug, that wasn’t needed for the Krampus. After 6 days of bikepacking in the Arizonan desert, the tyres have held up really well (-:
Jeff (at Two Wheel Drive) set up a Necked Romancer Pugsley the other day. For Rolling Darryls, holey or not, it seems only a simple rubber rimstrip is required to seat the tire. The Darryl seems to be less deep than either the RH or the Large Marge, which explains why Jeff was able to get everything set-up without any foam or extra duct tape.
In short: 20 x2.75-3.0″ tube, cut into a rimstrip. Fit it onto the rim, then mount the tire. A compressor should seat the tire, although Jeff said he stretched the rimstrip outward to help contain the air. Then remove the valve core and inject Stan’s sealant. Reinflate and trim excess rubber.
Great pointers on how to convert my Neck Romancer to tubeless. I’ll document the process once I source the correct materials to make it happen.
Thanks to you and Cass, I’m getting in some good armchair touring and mechanic work through your experiences. As I continue to pull together bikepacking equipment, I look forward to making the jump from observation to participation.
Pingback: Out the Door at Two Wheel Drive | gypsy by trade
Really?! Glitter?!
What pressure do you run with this tubeless set up on the Krampus?
Thanks!
JohnBonBenson
Thanks for the awesome writeup!
Finally received and built up my Krampus with the 120tpi Knards (for some reason others I know only got the 27tpi when purchasing…)
I’ve had toobless “success” so far (3 days and 1.5 rides) with a 26″ tube and surly rimstrip (no gorilla tape…) & about a syringe and a half of Stanz.
I’ve been playing with the pressure from about 9 to 12psi…
Pics o the build: https://plus.google.com/photos/118173497786051192935/albums/5839005733371225041
Thanks for that. I’m not sure Gorilla tape is totally required, I just figured it would make for a tighter fit. Good to know it’s working without.
That’s a cool looking build – particularly the bell (-; What size frame?
Nice score on the 120tpis too. That should save some heft. I’ve found sub 10 is the domain of snow, but my may not be super accurate, so it’s hard to know.
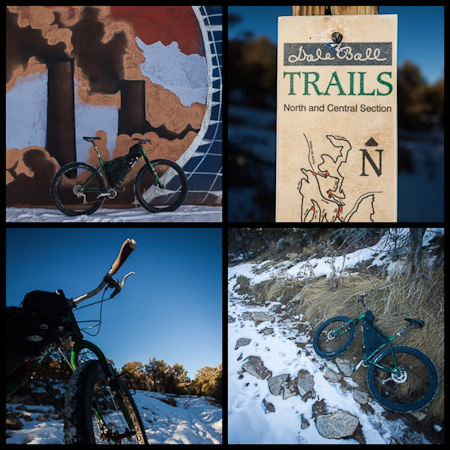
I’m just back from a few days bikepacking on the Arizona Trail, and the Krampus proved great fun. Enjoy…
Still experimenting… I’m not sure how accurate the gauge on my Pedro floor pump is, but I’ve varied them from 9-18psi, depending on the terrain. Mainly I’m just doing it by feel. Lower pressure up front. Too low, and they start to wallow about on anything but snow.
This lil buddy has become my best friend for the Moonlander and now Krampus: http://www.sks-germany.com/?l=en&a=product&r=tools&i=2000&AIRCHECKER
Nifty – and sure to be more accurate than thumb and finger…
Hey Cass,
Love the blog. Your photography is excellent, really makes me feel I’ve seen some places in the world I may never get to.
I had a question that you seem uniquely qualified to answer. I ride an Ogre, usually running Schwalbe Mondails for their versatility and durability. But even with the original WTB’s I felt like I took a beating when I set off on a day of rocky single track. I was going to get a second set of wheels built up to switch to when exclusively trail riding. Debating between using Rabbit Holes with a Knard up front and a 2.3 / 2.4 in the rear or going with a traditional tubeless wheelset built around some Stan’s No Tube Flows. The Rabbit Hole/Knard combo would weigh a lot more,is the extra volume worth the weight penalty? What direction would you go, wheelset wise, to use the rigid Ogre on rocky single track?
Well, thanks for putting such an awesome and informative blog out there. Enjoy what’s left of winter.
Hi Andrew,
Thanks for the comments!
At the end of the day, I think you’re always going to take a bit of a beating on a rigid bike over prolonged rocky singletrack… To mitigate this, I use a set of ti handlebars and Ergon grips to take the sting out of the ride. I find this really helps. Note too that the Ogre’s front fork isn’t the most compliant – it’s heavier duty than the Karate Monkey’s, for instance.
I’d go with the lightweight second set of wheels option. There’s only minimal tyre clearance with a Knard/Rabbit Hole clearance on an Ogre at the front. Tighter than I like, especially if there’s any mud, or your wheels knocks a little out of true. The tyre does give great bump absorption though.
If you want a light but robust and wide set of wheels, I’d go with the Flow EXs – the newer, lighter and wider version of the Flows. I’ve heard good things. Add in some 2.4s (maybe Maxxis Ardents) and run them tubeless, as you say, to offer plenty of scope with front air pressure without fear of pinch flats. I’ve heard there’s some even larger volume 29er tyres coming from Maxxis within a few months, so one of these might work too, depending on the tread.
That’s about the best ideas I can offer, short of moving to a carbon fork or suspension!!
Thanks so much for taking the time to answer. Great points about mud clearance, etc.
The rigid Ogre is perfect for 80% of my saddle time, so no suspension fork for now. I did put some Ergons on this past summer, huge improvement. Going to try the Flow EX/tubeless setup, should help a little more.
Thanks again for the advice.
Great write up, how aggressively have you ridden the setup? I want to race the knard 3.0 tubeless and on a rigid this weekend, am setting up today, but was curious if you think it can handle a tough course w/o burping. Thanks
Vince,
I’ve ridden it hard on my local rocky trails in New Mexico, and on the Colorado Trail – with no issues. That’s with the Rabbit Holes. Lots of laden bikepacking too.
Cass
Fixin’ to set up tubeless Marge Lites and Nards, and Rabbit Holes and Dirt Wizards for my Big Dummy. Also getting an Ice Cream Truck with a second 29+ wheel set and will do the same treatment for both of those wheel sets. Here in Santa Fe, movie’ to ABQ in the fall.
There’s room for Rabbit Holes and Dirt Wizards on the Dummy? Cool.
Yes. 26″ Rabbit Hole and Dirt Wizard in the back, and Moonlander fork, Marge Lite and 3.8 Knard in the front. (-:
When the 26″ Rabbit Hole and the 26+ Dirt Wizard came out, a Surly guy did a blog about setting up a Big Dummy this way. http://surlybikes.com/blog/post/an_even_bigger_dummy
Loved. This. Post. If you were using 24×1.90-2.35″ tubes for a 29er, what would you recommend for a 26″ fattie? I’m considering commuting to work through the puncture-prone streets of Brooklyn on 26×3.6″ Surly Black Floyds.
Thanks Pete! I’ve used 24in as well, though I expect you could stretch a 20in tube too. All the best on the Brooklyn streets!